Dell Laptop Screen Replacement:
12 Critical Safety Tips You Must Follow
A professional guide from the screen replacement specialists

Cracked, flickering, or dead screens are among the most common Dell laptop repairs — and the good news is that many users can successfully replace them at home. But without the right precautions, a DIY screen swap can quickly turn a £120 repair into a £600 motherboard replacement.
At mylaptopscreen.com, we have shipped hundreds of thousands of Dell replacement screens to technicians and DIY enthusiasts worldwide. This guide compiles the most important safety tips our support team shares with customers every single day.
📄 Table of Contents
- Power Down Completely
- Use an Anti-Static Wrist Strap
- Use the Right Tools
- Photograph Before Disconnecting
- Handle the Screen by Its Edges
- Know Your Connector Type
- Never Force a Ribbon Cable
- Work in a Clean Environment
- Organise Screws by Location
- Test Before Reassembling
- Re-seat the Screen Before Clipping
- Dispose Responsibly

This is the single most violated rule. Pressing the power button until the screen goes black is not enough. You must:
- Shut down via the operating system (Start → Shut Down)
- Wait a full 60 seconds after shutdown before touching any hardware
- Unplug the power adapter from the wall — not just from the laptop
- Remove the battery if your Dell model has a removable one
Why it matters: Modern Dell laptops — including the XPS, Inspiron, and Latitude series — use capacitors that retain charge for up to 30 seconds after shutdown. Even a residual charge of 5V can damage sensitive LCD ribbon cables.

Your body carries a static charge that is completely invisible and absolutely lethal to electronics. The human body can hold charges of 10,000–35,000 volts — far above the 100–200V threshold that destroys laptop display controllers.
- Wear an ESD wrist strap connected to a grounded surface throughout the entire repair
- If no strap is available, regularly touch an unpainted metal surface on a grounded appliance
- Never work on carpet or in low-humidity environments without ESD protection

Using inappropriate tools is the number-one cause of cosmetic damage during screen replacements. A standard flathead screwdriver will snap Dell bezel clips on first contact. You need:
- Plastic spudger or pry tool — for opening bezels without scratching
- Plastic opening picks — for running along the bezel seam
- JIS/Phillips #00 and #0 precision screwdrivers — Dell uses very small screws
- Non-magnetic, non-conductive tweezers — for handling connectors
- Microfibre cloth — to lay the screen face-down without scratching
Avoid any metal pry tools near the display panel itself. Dell IPS and OLED screens are extremely fragile at the edges and can crack from as little as 2kg of lateral force.

Before removing a single cable, take photos of:
- The routing path of every ribbon cable
- The screw hole locations and screw sizes
- How the bezel clips seat into the lid chassis
- Any tape or adhesive strips that secure cables
Use your smartphone and take at least 3 angles per area. These photos will save you hours of confusion during reassembly, especially on Dell XPS models where cable routing is particularly dense.
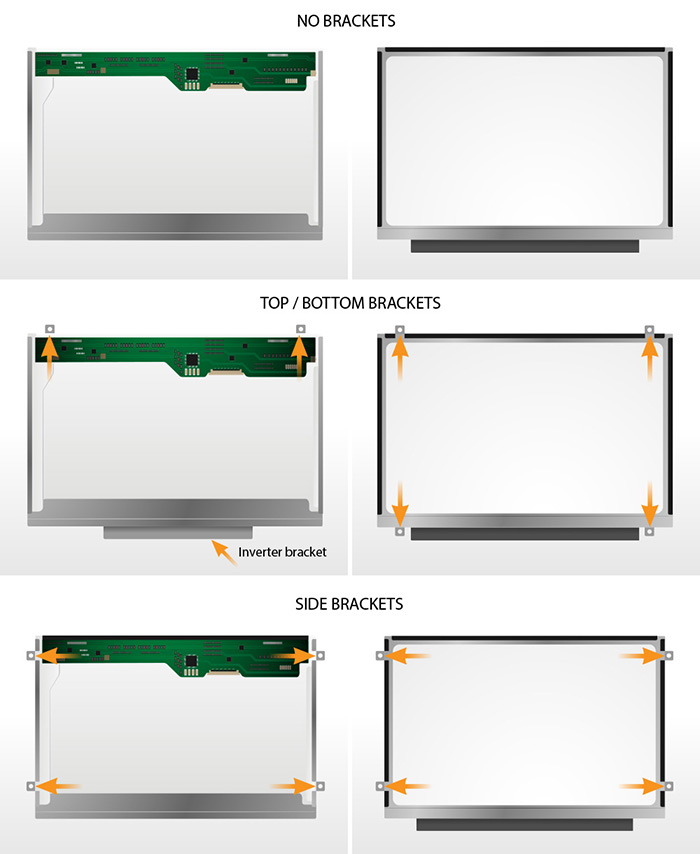
Your replacement screen from mylaptopscreen.com arrives factory-sealed, but mishandling it before installation can cause pressure damage and dead pixels. Always:
- Hold the screen only by its metal frame — never touch the glass surface directly
- Lay it face-up on a clean, flat, non-abrasive surface
- Keep it away from magnets, speakers, and heat sources during installation
- Never apply pressure to the back of the panel — this creates visible pressure spots
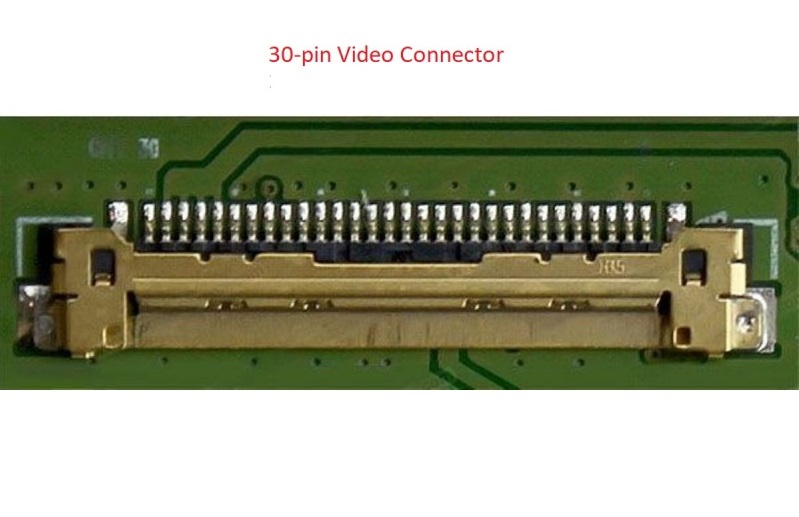
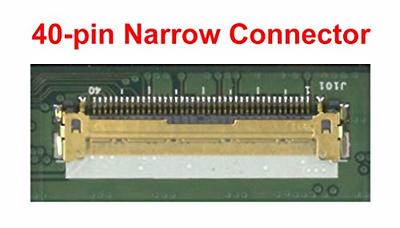
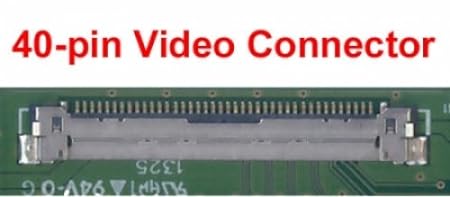
Dell uses at least four different connector types across its product lines: 30-pin eDP, 40-pin eDP, LVDS (legacy), and proprietary connectors on some XPS models. Installing the wrong screen will result in no display output even if it physically fits.
To confirm your connector type:
- Check your Dell service tag at dell.com/support to see the exact original display specification
- Photograph your existing connector before ordering a replacement
- At mylaptopscreen.com, enter your exact model number — our compatibility engine filters only confirmed-compatible replacements

Dell screen ribbon cables use ZIF (Zero Insertion Force) connectors — they are designed to connect with almost no physical pressure. If you are forcing a connector, something is wrong:
- Check that the locking tab (the small plastic bar) is fully flipped open
- Ensure the cable is perfectly straight and not kinked
- Never use tools to push a ribbon cable — use only clean fingertips
Dust particles, pet hair, and debris introduced between the screen layers are visible as dark spots after reassembly and cannot be removed without full disassembly. Before starting:
- Wipe down your work surface with a lint-free cloth
- Work under strong, direct lighting — shadows hide loose connectors and misaligned clips
- Keep pets and children out of the workspace
- Avoid eating or drinking near the repair area — liquid contamination on display connectors is permanent

Dell laptops often use 3–4 different screw sizes in the same chassis. Mixing them during reassembly can strip threads, crack plastics, or prevent the lid from closing properly.
- Place a piece of white paper on your work surface and lay screws in the position they came from
- Label each group: “Hinge left — M2 x 4mm”
- Magnetic screw mats are an excellent investment for regular DIY repairs
- Never put screws in a single pile or container — they will inevitably mix

This is the most time-saving tip of all. After connecting the replacement screen but before clipping the bezel:
- Reconnect power and boot the laptop
- Check for full image across the entire panel — no dead rows, no backlight bleed, no colour banding
- Test brightness controls via the function keys
- Check the screen at multiple angles for IPS glow
One of the most common post-repair complaints is a screen that does not sit flush in the lid, creating visible gaps or pressure points. Before pressing the bezel clips:
- Lay the screen into the lid cavity and check all four edges align evenly
- Start bezel clips from the bottom centre and work outward
- Never start with corners — corners are the last thing to clip
- Listen for each clip to “click” — a silent or mushy press means the clip is not seated

LCD and OLED screens contain hazardous materials including mercury (in CCFL backlights on older Dell models) and various heavy metals. Improper disposal is illegal in most countries.
- Take the screen to your local WEEE (Waste Electrical and Electronic Equipment) recycling point
- Many councils and electronics retailers offer free screen recycling
- Do not dispose of screens in general household waste
Summary: Your Pre-Repair Safety Checklist
Before you start any Dell screen replacement, run through these essentials:
- Full OS shutdown + 60-second wait + unplugged from wall
- ESD wrist strap on and grounded
- Plastic pry tools and precision screwdrivers ready
- Camera out — photos taken before any disconnection
- Correct replacement screen confirmed via Dell service tag
- Clean, well-lit workspace prepared
- Screw organisation system in place
- Power-on test planned before bezel reassembly
Ready to Order Your Replacement Dell Screen?
mylaptopscreen.com stocks over 50,000 compatible Dell laptop screens for every model from the Inspiron 3000 series to the XPS 17 OLED. Our compatibility guarantee means if the screen is listed for your model, it will fit — or we replace it free of charge.
Find My Dell Screen →